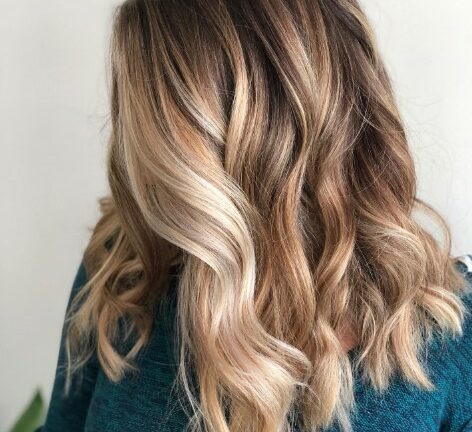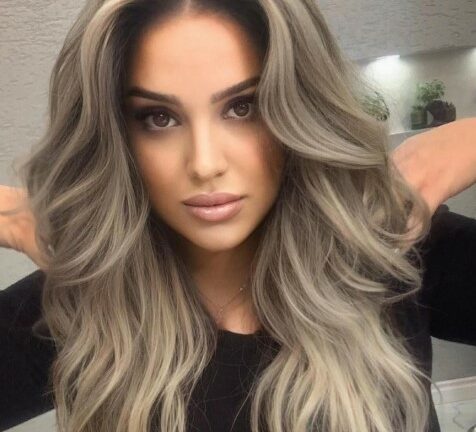
Balayage hair has been a popular trend for many years now, and it’s not hard to see why. This technique, favored by celebrities, creates a beautiful natural-looking highlighted effect that is low-maintenance and lasts longer than traditional foil highlights. It’s a great option for those who want to add some lightness and dimension to their hair without the worry of maintaining regular salon appointments.
If you’re nervous about trying balayage, don’t be! With the right steps and some foolproof formulas, you can easily achieve a stunning result. The best part is, you don’t need to be a professional hairstylist to do it. You can make balayage work for you right at home.
Before we dive into the step-by-step guide, let’s understand what balayage actually is. Balayage is a French word that means “to sweep” or “to paint.” In the context of hair, it refers to a technique where color is hand-painted onto sections of hair to create a natural, sun-kissed look. Unlike traditional highlighting methods that use foils, balayage allows for a more blended and naturally grown-out effect.
So, let’s get started! Here is a step-by-step guide on how to balayage your hair for stunning results:
- Divide your hair into sections: Start by dividing your hair into sections for easier application. You can use clips or hair ties to separate the front and back sections. This helps ensure that you don’t miss any areas and allows for more control.
- Mix your color: Balayage typically involves using lightening products to achieve the desired effect. You’ll need to mix your lightening powder or cream with a developer according to the instructions provided. This mixture will help lighten your hair.
- Work from the bottom up: Begin applying the lightening mixture to the bottom sections of your hair. Start a few inches from the ends and work your way up towards the mid-lengths. This technique creates a more lived-in look and prevents the color from looking too drastic or unnatural.
- Focus on the front sections: The front sections of your hair are the most visible, so it’s important to give them extra attention. Apply the lightening mixture to the front sections, focusing on the areas that would naturally be highlighted by the sun, such as the ends and around the face.
- Blend, blend, blend: Balayage is all about creating a seamless blend between the lightened sections and your natural hair color. Use your fingers or a brush to blend the color into the rest of your hair, making sure there are no harsh lines or noticeable transitions.
- Let it process: Once you’ve applied the lightening mixture, let it process according to the instructions provided. This usually takes around 30 minutes to an hour, depending on your hair’s natural color and the desired level of lightness.
- Wash and style: After the processing time is up, wash your hair thoroughly to remove any leftover lightening product. Style your hair as desired and admire the stunning balayage effect you’ve achieved!
One drawback of at-home balayage is that it may not always be as superior as a salon treatment. Professional colorists have years of experience and knowledge to create the perfect balayage tailored to your specific hair type and desired look. However, with the right techniques and products, you can still achieve a beautiful result.
If you’re unsure about doing balayage yourself, or if you want a more drastic change, it’s always best to consult with a professional colorist. They can help you determine the best approach and give you the results you’re looking for.
Now that you know the step-by-step process and have some tips and tricks to get you started, go ahead and try balayage at home! This popular technique is a great way to add dimension and a sun-kissed look to your hair without the need for constant salon appointments. Get ready to embrace that effortlessly chic, lived-in hair look!
Prepare Your Hair for Balayage
Before you begin the balayage process, there are a few steps you need to take to ensure that your hair is ready for the treatment. Follow these steps to prepare your hair for stunning balayage results:
- Divide your hair into sections: To make the balayage process easier, divide your hair into smaller sections. This will help you apply the color more evenly and ensure that all areas are covered.
- Clean your hair: Make sure your hair is clean and free from any styling products. This will help the balayage color adhere better to your strands.
- Protect your scalp: Apply a thin layer of petroleum jelly or a protective cream along your hairline and on your ears to prevent the color from staining your skin.
- Apply a toner if needed: If your hair has any unwanted tones or shades, you can apply a toner before beginning the balayage process. This will help neutralize the color and create a more even base for the balayage.
- Use a textured approach: Balayage is all about creating soft, blended highlights. To achieve this effect, use a freehand painting technique and paint the color onto your hair in a natural, textured motion. This will give your balayage a more natural and dimensional look.
- Start from the ends: When applying the balayage color, start from the ends of your hair and work your way up towards the roots. This will give your balayage a more natural, sun-kissed look.
- Leave some hair untouched: To create a more natural and lived-in look, leave some sections of your hair untouched by the balayage color. This will help create depth and dimension.
- Shake off excess color: After applying the balayage color, shake your hair gently to remove any excess color and blend the highlights seamlessly.
- Rinse your hair: Once you’ve completed the balayage process, rinse your hair thoroughly to remove all the color. Use a gentle shampoo and conditioner to keep your hair healthy and vibrant.
Follow these steps to prepare your hair for the balayage treatment at home. Remember to take into account your hair texture, preference, and the desired result. Balayage is a versatile technique that can be customized to suit different hair types and styles. If you’re unsure or want a more professional touch, consider visiting a salon for expert balayage application.
For more detailed instructions and step-by-step guides, you can refer to reliable sources and tutorials to ensure you achieve stunning balayage results. Don’t worry if your first attempt isn’t perfect; balayage takes practice and patience to perfect.
When it comes to maintaining your balayage, be prepared for touch-ups every few months. The roots may need more attention, so be sure to consult your hairstylist for the best approach. Additionally, using color-safe and hair-nourishing products will help preserve the longevity and vibrancy of your balayage. Consider using purple shampoo or toning treatments to keep brassy tones at bay and keep your balayage looking fresh.
Apply the Balayage Technique for a Beautiful Blonde Color
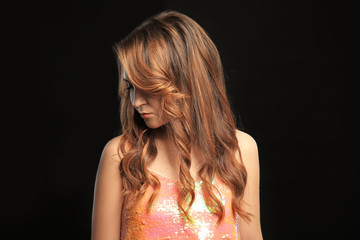
The balayage technique is a popular method for achieving a beautiful blonde color. It is a freehand painting technique where the colorist applies the color onto the hair in a sweeping motion, creating a dimensional and natural-looking result. This technique is not only for blondes, but brunettes can also benefit from it to add depth and dimension to their locks.
Step 1: Prepare the Hair
- Start with clean and dry hair.
- Protect your client’s clothing with a towel or cape.
- Divide the hair into manageable sections and secure with clips.
Step 2: Mix the Lightener
- In a mixing bowl, combine the lightening powder with the developer according to the ratio mentioned in the instructions.
- Stir the mixture until it forms a smooth consistency.
Step 3: Apply the Lightener
- Start with the back sections of the hair.
- Take thin sections of hair and lay them flat on the foil.
- Using a color brush, apply the lightener onto the hair, focusing more on the mid-lengths and ends rather than the roots.
Step 4: Create the Balayage Effect
- Once the back sections are complete, move on to the front sections.
- Use the balayage technique to paint the color onto the hair, starting towards the tips and gradually blending it up towards the roots.
- Avoid applying the color evenly or from roots to ends; the goal is to create a natural and blended look.
Step 5: Let the Color Develop
- Cover the hair with foils or plastic wrap to keep the color from drying out.
- Leave the color on for the recommended time, usually between 30 minutes to an hour, depending on the desired lightness.
- Monitor the color as it develops to ensure it reaches the desired tone.
Step 6: Rinse and Treat the Hair
- Rinse out the remaining bleach with warm water.
- Apply a deep conditioning treatment to restore moisture and nourish the hair.
- Use hair oils to add shine and style as desired.
Once the hair is dry, you’ll be left with a beautifully blended balayage color that looks natural and sun-kissed. Balayage is a great option for those looking to achieve a lighter, dimensional color that lasts longer than traditional highlights. Remember to consult with an expert colorist if you’re unsure about which tones and techniques to select.
Questions and answers:
Can I do balayage at home?
Yes, you can do balayage at home. However, it is recommended to have some experience in hair coloring or seek professional help to achieve the best results.
What tools do I need for balayage?
For balayage, you will need a balayage paddle or brush, foils, a mixing bowl, a hair color brush, gloves, and a comb.
How long does it take to balayage hair?
The time it takes to balayage hair depends on the length and thickness of your hair as well as the desired result. Generally, it can take anywhere from 1 to 3 hours.
Do I need to bleach my hair before balayage?
Not necessarily. If your hair is already light enough, you can skip the bleaching step and directly apply the balayage color. However, if your hair is dark, bleaching may be necessary to achieve the desired result.
How often do I need to touch up balayage?
The frequency of touch-ups for balayage varies depending on how fast your hair grows and how faded the color becomes. On average, touch-ups are done every 10-12 weeks.